This chapter contains the following topics:
Printing Checking Account Reports
The Reports selection provides access to several reports for PBS Check Reconciliation.
From the Reports menu, you may print the following C/R reports:
| • | The Reconciliation Report |
| • | The Checkbook Report |
| • | The Checkbook List |
| • | The Account Activity Report |
You may also print your Checking Account List and your Distribution To G/L report from the Reports menu.
This report is designed to help you with a reconciliation that is in progress. You can print the in-progress reconciliation summary as well as cleared and uncleared entries.
You may also print the details of a previous reconciliation by entering the statement date of that reconciliation.
The Reconciliation report normally has two parts:
| • | The list of checkbook entries with debit total, credit total and difference. |
| • | If a reconciliation is currently in progress, the reconciliation summary shows the statement balance, checkbook balance as of the reconciliation date, the summary of the cleared and uncleared entries and more. |
It does not print uncleared items after the cut-off date.
Stop payments do not print on the report details or be included in the summary amounts. You may change a stop payment to a regular check or void using Load checkbook. Then it will print on this report.
See a Reconciliation Report (No Reconciliation) example with no reconciliation in progress and a Reconciliation Report (Reconciliation in-progress) example in the Sample Reports appendix.
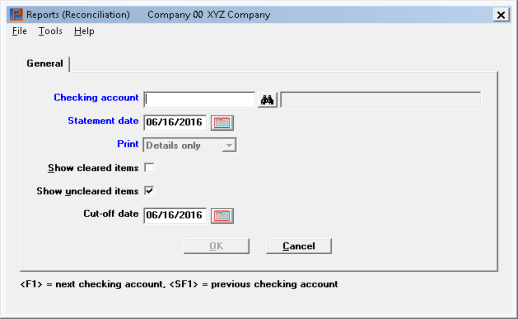
Select
Reconciliation from the Reports menu.
Graphical Mode
The following screen displays:
Skip to the Checking account field.
Character Mode
Options
Checking account:
A screen displays for you to enter the checking account for which you want to print the report. You can also use the option:
|
<F1> |
For the next checking account |
|
Example |
Press <F1>, then press <Enter> twice |
Select Enter and the following screen displays:
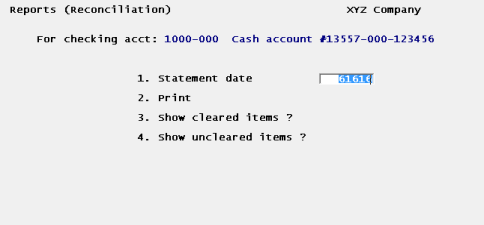
When using character mode skip to the Print field.
Graphical Mode
In graphical mode enter the information as follows:
In graphical mode only, enter the checking account for which you want to print the report. You can also use the option:
|
<F1> |
For the next checking account |
|
<SF1> |
For the previous checking account |
|
<F8> |
For accessing the lookup for selecting the account. In graphical mode you may also click on the lookup button |
|
Example |
Press <F1>, then press <Enter> |
Both Graphical and Character Modes
Enter the statement date or use the default date of the reconciliation in progress. This date is set in Checking accounts.
You may also enter a date of a previous reconciliation to print the cleared entries. In this case it is recommended that you do not check (or enter Y) the Show uncleared entries field.
|
Format |
MMDDYY |
|
Example |
Press <Enter> |
This field can only be changed if there is a reconciliation in progress for the selected account. If there is no reconciliation in progress you may only print details.
When there is a reconciliation in progress you have three options:
|
D |
Details only |
This allows you to print the account details only with no summary |
|
S |
Summary only |
This allows printing the reconciliation summary only |
|
B |
Both |
This option prints both the details and reconciliation summary |
|
Format |
One option from the list above. The default is Both |
|
Example |
Type B |
If you selected Summary only for the Print field, this field is not available.
Check the box (or answer Y in character mode) if you want to show entries that have already been cleared on the reconciliation date; otherwise, leave it unchecked (answer N).
|
Example |
Graphical mode: Check the box using the space bar Character mode: Type Y |
If you selected Summary only for the Print field this field is not available.
Check the box (or answer Y in character mode) if you want to show uncleared entries; otherwise; leave it unchecked (answer N).
|
Example |
Graphical mode: Check the box using the space bar Character mode: Type Y |
If you selected Summary only for the Print field this field is not available. If the Show uncleared items field is unchecked this field is also not available.
If you selected to show uncleared entries, enter the cut-off date. All uncleared entries having dates on or before this date will be shown on the report.
This field defaults to the in-progress reconciliation date. If you changed it from the reconciliation date to some other date you can press <F2> to go back to the reconciliation date. You may use the option:
|
<F4> |
Graphical mode: For accessing the calendar date selector select <F4> key or click on the calendar button Character mode: Use <F7> to access a date selector |
|
Format |
MMDDYY |
|
Example |
Press <Enter> |
Enter OK to select and printer and print the report or cancel to not print and return to the menu.
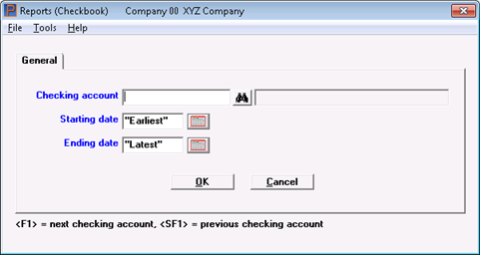
This report shows checkbook entries in order by date, along with a running balance.
See a Checkbook Report example in the Sample Reports appendix.
Select
Checkbook from the Reports menu.
The following screen displays in graphical mode:
Options
Enter the checking account for which you want to print the report. You can also use the option:
|
<F1> |
For the next checking account |
|
<SF1> |
For the previous checking account |
|
<F8> |
For accessing the lookup where you can select the checking account |
|
Example |
Press <F1>, then in graphical mode press <Enter>. In character mode press <Enter> twice |
After you enter the checking account, the following screen displays in character mode:
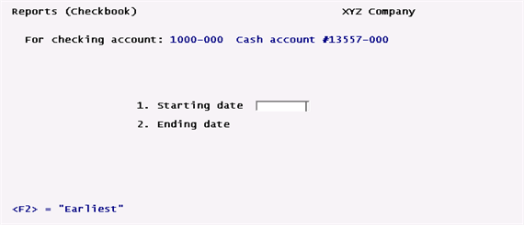
Enter the following information:
Ending date
Enter the range of dates to show on the report. You may use the options:
|
<F2> |
For Earliest on Starting date and Latest on Ending date |
|
<F4> |
Graphical mode: For accessing the calendar date selector or click on the calendar button. Character mode: Use <F7> to access a date selector |
|
Format |
MMDDYY in each field |
|
Example |
Press <F2> for each field for a range from Earliest to Latest |
The Starting balance is the balance of all entries before the starting date.
Select OK to print the report or cancel to return to the menu without printing the report.
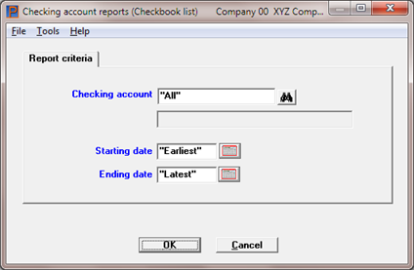
Select
Checkbook list from the Reports menu.
Graphical Mode
This screen displays:
Character Mode
The following screen displays:
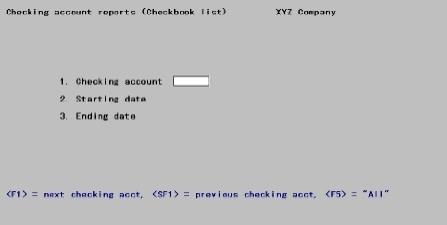
See a Checkbook List example in the Sample Reports appendix.
Enter the information as follows:
Options
Enter the number of the checking account you want to print the report for, or use one of the options:
|
<F1> |
For the next checking account |
|
<SF1> |
For the previous checking account |
|
<F5> |
To print the report for All checking accounts |
|
<F8> |
To access the lookup |
|
Example |
Press <F5> |
Enter the range of dates to show on the report. Follow the screen instructions. You have this option:
|
<F4> |
In graphical mode, to access the date selector for both fields. In character mode use <F7> |
|
Format |
MMDDYY |
|
Example |
Press <F2> for each field for a range from earliest to latest |
If you change the status of an entry to Void or Stop-payment, the date that action was taken will appear in the Clear-date column of the report.
Select OK to print the report or Cancel to return to the menu without printing.
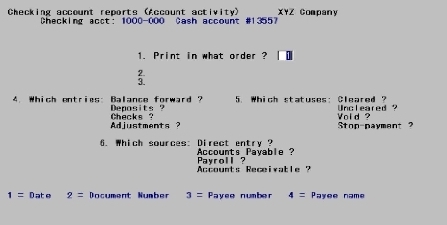
This report shows checkbook activity in several different ways. You can look at just about any cross-section of entries you have in your checking account.
For example, you could print a list of checks written to a specific payee and a list of which of those checks have cleared. Or you could print a report showing which entries originated from Accounts Payable, Payroll, or Accounts Receivable, or which entries you entered directly in C/R.
See an Account Activity Report example in the Sample Reports appendix.
Select
Account activity from the Reports menu.
The following screen displays:
Graphical Mode
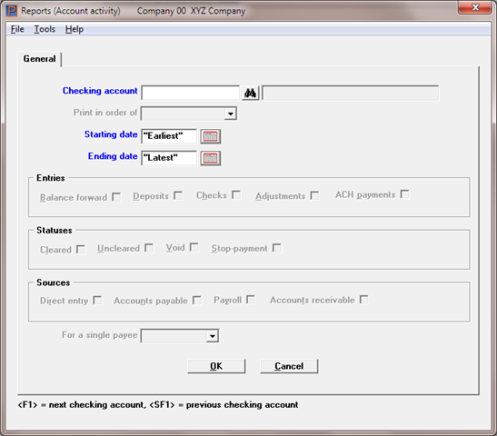
Enter the checking account for which to print the activity report or use the option:
|
<F1> |
For the next checking account |
|
<SF1> |
For the previous checking account |
|
<F8> |
For finding the account via the lookup. You may also click on the lookup button |
Character Mode
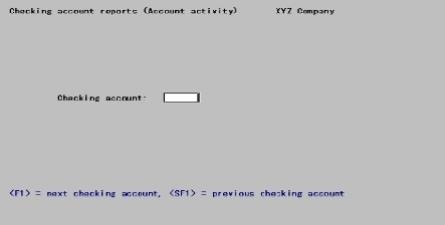
Options
Enter the checking account for which to print the activity report or use the option:
|
<F1> |
For the next checking account |
|
<SF1> |
For the previous checking account |
|
Example |
Press <F1>, then press <Enter> twice. |
The following screen displays:
Options
Enter one of the following (or press <Enter> for the default of date order):
|
Character mode |
Graphical Mode |
|
1 |
Date |
|
2 |
Document number |
|
3 |
Payee number |
|
4 |
Payee name |
|
Format |
Graphical mode: Drop down list Character mode: Numeric, enter either 1, 2, 3 or 4 |
|
Example |
Press <Enter> |
Ending
Enter the range of values to show on the report. The field names (and values to enter) depend on what order has been entered above, as follows:
|
Date |
Starting date / Ending date |
|
Document number |
Starting document number / Ending document # number |
|
Payee number |
Starting payee number / Ending payee number |
|
Payee name |
Starting payee name / Ending payee name |
Press <Enter> at each type of entry you want to show on the report and uncheck the box for those types you don’t want to show. Here is an explanation of each type and where they originate:
|
Balance forward |
This is the balance brought forward created when first setting up an account. A balance forward record can also be created when running the Compress cleared entries utility |
|
Deposits |
Deposits usually originate in Accounts Receivable when printing a deposit slip. A deposit can also be created using Checkbook entries |
|
Checks |
Checks are normally created when printing and posting checks in Accounts Payable and Payroll. They can also be created using Checkbook entries |
|
Adjustments |
All adjustments are created using Checkbook entries. They can start as an adjustment type or transfer type |
|
ACH payments |
This is a direct deposit payment type created when generating an ACH file in Accounts Payable and Payroll. They can also be created using Checkbook entries |
Any of the above types can also be entered using Load checkbook. However, using Load checkbook bypasses posting to General Ledger so should only be used for special circumstances.
Options
You may also use the option:
|
<F5> |
To show "All" types of entries. The default for each is checked in graphical mode and Y in character mode |
|
Example |
Press <F5> |
Press Enter> at each status you want to show and uncheck each box for those types you don’t want to show. These include:
|
Cleared |
These are entries cleared during a reconciliation process |
|
Uncleared |
These are entries that have not been cleared |
|
Void |
These are generated in Accounts payable when voiding checks or direct deposit payments during Print checks and post or voiding the printing of a Payables immediate check. They will always have an amount of zero. When this field is checked a void entry is printed regardless of the Cleared and Uncleared status |
|
Stop-payment |
This is a temporary status. Once the stop-payment has been verified you should change it to a void using Load checkbook |
Options
You may also use the option:
|
<F5> |
To show "All" statuses. The default for each is checked in graphical mode and Y in character mode |
|
Example |
Press <F5> |
Options
Press <Enter> at each source you want to show and uncheck the box (answer N) at those sources you don’t want to show. Using character mode Not applicable displays for each module you are not using. You can also use this option if any modules are interfaced:
|
<F5> |
To show "All" sources |
The entries shown for each source are:
|
Direct Entry |
Shows entries entered directly into Check Reconciliation using Checkbook entries. Direct entry must be set to Y (default) if you are not transferring from A/P, Payroll or A/R (as defined in the Control information). Direct entries may also come from external applications through a direct SQL interface or Data import. |
|
Accounts Payable |
Shows checks transferred from A/P |
|
Payroll |
Shows checks transferred from Payroll |
|
Accounts Receivable |
Shows deposits transferred from A/R |
|
Example |
Defaults to Y for Direct Entry, since Check Reconciliation is being used stand-alone |
Options
This question can only be entered if you selected to print in date order or document number order, and you have selected to show checks. If neither A/P nor Payroll is being used your entry is not relevant; otherwise, select one of the following:
| Character Mode | Graphical Mode | What it does |
|
N |
No |
Shows all checks regardless of payee |
|
V |
A/P Vendor |
shows checks from A/P for a single vendor |
|
E |
PR Employee |
shows checks from Payroll for a single employee |
|
D |
Direct Entry |
shows checks entered directly into the Check Reconciliation module for a single payee |
|
Note |
Direct Entry refers to a single payee only. You must have selected to print in date order or document order, as well as selected to show checks. |
If you are not using A/P, you cannot select a single vendor. If you are not using Payroll, you cannot select a single employee.
If you select A/P Vendor (or enter V), enter the vendor number (you can enter a vendor that is not on file in A/P vendors), or use one of the options:
|
<F1> |
For the next vendor |
|
<SF1> |
For the previous vendor |
|
<Enter> |
Leave the vendor number blank to look up the vendor by name. The screen prompts you to select a vendor by name. |
If you select PR employee (or enter E), you can select a single employee in the same way.
If you select Direct entry or A/P vendor (enter D or V in character mode), enter the payee number or use the option to look up the payee by name. Checks having a payee number matching the number you entered, or having a payee name matching the portion you entered, will be shown.
|
Format |
Graphical mode: Drop down list Character mode: One character |
|
Example |
Press <Enter> for No |
Select OK to print the report or cancel to return to the menu without printing the report.